Visualizing the Identifield
Edit: I've revised the term for the concept described below to be identifield. I was originally calling it a bonkerfield but realized that is too confusing.
For the past few weeks, I've been trying to figure out how to visually describe a philosophical concept that I've come up with called an identifield. It's something I find fascinating, but quite hard to wrap my own head around entirely. I've been ruminating on how to convey it for a while now, trying to be able to get the idea across and not sound like a crazy person or an idiot.
I've elaborated on this subject at length on my reasons page, but in short, an identifield is a map of everywhere that any information has resided throughout all of space and time. The idea sounds convoluted in words, but it's something that I have a pretty decent image of in my mind.
Originally I was planning to create a conceptual piece without too much detail. I made a weak attempt in this sketch. Hopefully, You get the idea of connectedness between different spots as if the idea is kind of being put together towards a single point in time and then disseminated on the other side.

As I thought about it more, I figured it would be possible to realize this idea in a more concrete way. I could find someone's record of the formation and dissemination of some idea and visualize the actual data itself.
Following information around in space and time is still pretty nebulous so I know I'm doomed to failure in some sense. Still, I wanted to try using the tools of the modern data scientist to manifest this philosophical concept.
Spatiotemporally Fixed Hierarchical Clustering in d3
Like I normally do in this situation, I went and scanned the web for things that already look kind of similar to what I'm trying to build. At it's core, I wanted swoopy, pretty lines that connected nodes. I figured that Mike Bostock of d3 fame must've built something like this at some point, and I wasn't dissapointed.
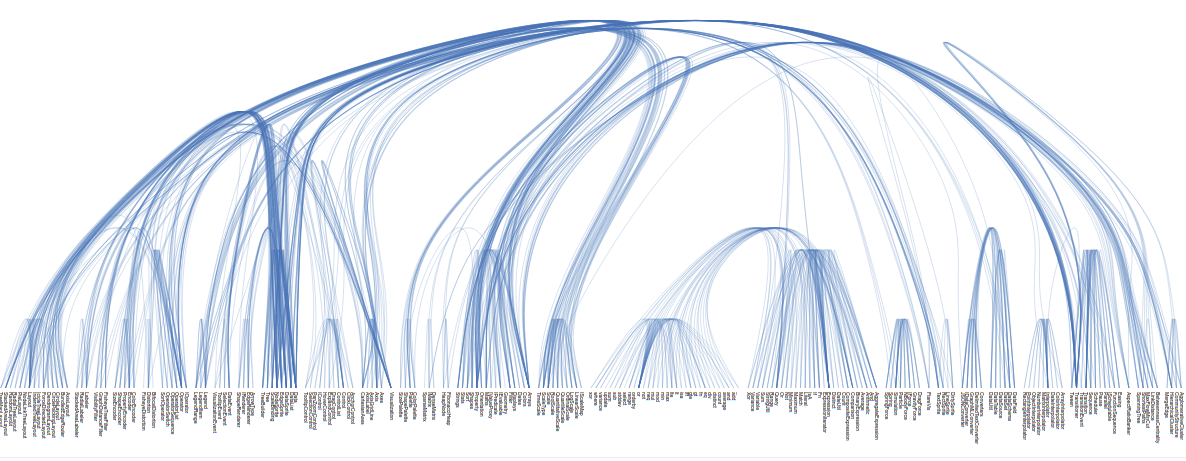
He'd built this hierarchical clustering vizualitation that is a little different than what I want, but still really reminds me of the general feel. The data he was vizualizing in this example was the interconnectivity of software packages in a codebase. He's used this as a basis for several different visualizations, and humorously, I had previously exploited some of his related work to make another attempted vizualization of all the people I had worked with in my life.
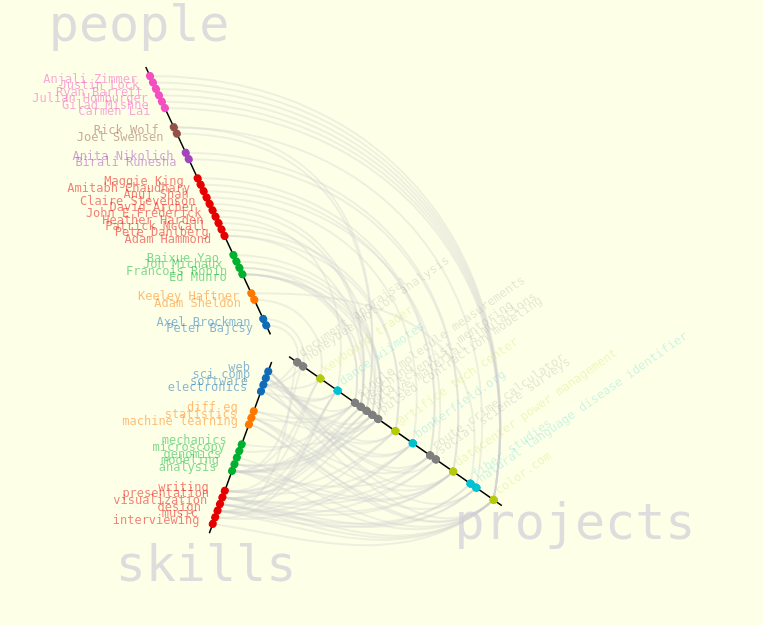
I have another post that explains building that visual. It had constrained all projects along one radial line, skills on another, and people on a third. To vizualize the identifield, I needed to do something similar except the positional constraint would be along the x-axis and it would vary based on time.
The time of interest is the time that some discernible event related to the formation of an idea would take place. For now, I decided that spatial position wouldn't be demarked explicitly along the other axis. Instead, I would use the clustering of events to automatically set where they lay. This way there shouldn't be too many overlapping lines in the final result.
Selecting a test idea
To get started testing, I needed a simple example scenario to try to visualize.
Imagine an author is writing a paragraph about a childhood memory with her mother. In the paragraph, she quotes the phrase "Call me Ishmael" from Moby Dick. Both of those pieces of information are baked into the identifield of that paragraph. After she publishes that paragraph in her memoir, a few Melville academics cite her. In addition, something she says in that paragraph blows up as a meme on the internet.
Maybe this scenario isn't that realistic, and definitely not the best candidate to demonstrate the value of the identifield as a construct. Still, it's simple enough and contained enough that I could keep it in my head long enough to hand annotate the data structure I was going to use for it.
Results
You can view below for the implementation details, but before that I wanted to show what the general results were. Below is an implementation of the scenario above. On the top left, is the reference to Moby Dick's "Call me Ishmael", which in turn references Ishmael in the Bible. The bottom right is the "viral" expansion as that paragraph blows up on the internet.

There were a number of variations that I want to be able to work with when building identifields. The framework I've built allows me to vary the number of lines, the opacity and the random dispersion of their endpoints. The next two images show what happens when I turn up the randomness on the viral part of the example.


You can see the live d3 graph and the code to produce it on this bl.ock. Next, I want to explore building more complex underlying identifields.
A more complex identifield
After building the simple version, I really wanted to scale it up to a more complex and interesting example. Unfortunately, I didn't quite have time to compile real data or come up with another complicated story for this one. Instead, I just tried generating a random hierarchy. The results were quite surprising.
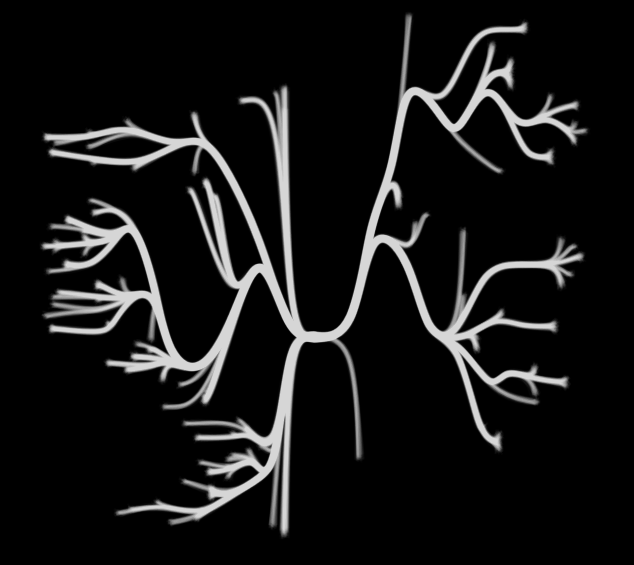
When this image rendered, I've was overwhelmed with the similarity to a neuron. There's really a beautiful correspondence between the bonkerfield and the brain that hadn't even occurred to me as I was building it. The bonkerfield of any information in a human mind could be traced down through the individual neurons that collectively record it. So it's really fitting that like in this classic illustration from Santiago Ramón y Cajal.
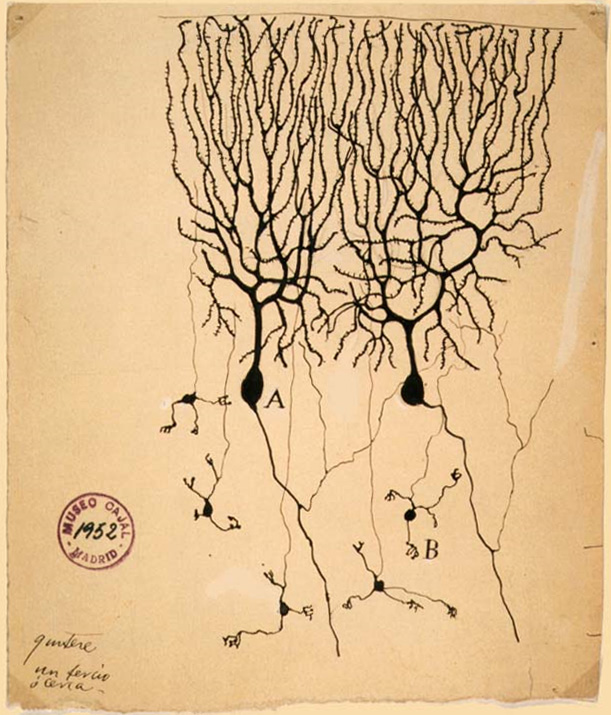
What's more amazing, was the how the parameters that I used to generate the random graph varied the the overall structure
See below for implementation details. I will be back soon with an analysis of how a few parameters can control the architecture of the complicated. And once I get a really good example where I can work through and compile the data, I'll update with a thorough explanation of a rendering of a true identifield.
Implementation
The rest of this article can help walk you through adapting my code and data to build your own identifield visualizations.
Compiling the data
I had to hand annotate a json document in the structure needed for d3 to render it using the d3 "bundle" layout. Even though my data isn't really any kind of hierarchy, I'm sort of hacking the format that the d3 hierarchical bundling wants.
The minimal format to make it work requires two things:
- a
.delimited naming structure to define the hierarchy - an import structure to define where th lines should be drawn between.
I want everything to be drawn for the lowest nodes back up to the "paragraph" node, so I only need imports from the leafs to the paragraph node. To create a hierarchy for the leafs, I just needed to come up with higher order groupings that link things so their lines get drawn together on the way back up to the "paragraph" node. The following document shows a simple example that would take two leaves for bible and melville and link them back to the paragraph via mobydick
[
  {"name":"paragraph.mobydick.bible","imports":["paragraph"]},
  {"name":"paragraph.mobydick.melville","imports":["paragraph"]},
  {"name":"paragraph.mobydick","imports":[]},
  {"name":"paragraph","imports":[]},
]
To generate the full vizualization I added a couple more routes for the information to flow up to the paragraph. I also added an additional time, size, and weight params that would set the x-position, the thickness of the line, and the transparency of the stroke, respectively.
[
  {"name":"paragraph.gap.visit.mom","time":100,"size":20,"weight":0.1,"imports":["paragraph"]},
  {"name":"paragraph.gap.visit.memory","time":100,"size":10,"weight":0.01,"imports":["paragraph"]},
  {"name":"paragraph.gap.blog.quotes","time":70,"size":10,"weight":0.05,"imports":["paragraph"]},
  {"name":"paragraph.gap.blog.mobydick.bible","time":10,"size":10,"weight":0.01,"imports":["paragraph"]},
  {"name":"paragraph.gap.blog.mobydick.melville","time":10,"size":10,"weight":0.1,"imports":["paragraph"]},
  {"name":"paragraph.gap.blog.mobydick","time":70,"size":10,"weight":0.05,"imports":[]},
  {"name":"paragraph.gap.visit","time":200,"size":10,"weight":0.05,"imports":[]},
  {"name":"paragraph.gap.blog","time":200,"size":10,"weight":0.05,"imports":[]},
  {"name":"paragraph.gap","time":300,"size":10,"weight":0.05,"imports":[]},
  {"name":"paragraph","time":350,"size":10,"weight":0.05,"imports":[]},
  {"name":"","time":350,"size":10,"weight":0.05,"imports":[]}
]
I also made a similar document to render the other side of the bonkerfield visualization.
Coding the d3 vizualition
Starting from the example code that I found on bl.ocks.org, I started making tweaks to the code. Most of them were fairly minor sizing issues and rotations of things. The only thing that was really crucial was figuring out how to set the x-position using the "time" field from the document. Without that, the layout would put everything on one vertical line, which doesn't quite work for me.
The only crucial modification was to the node location, which required adding two bits of code. The first was to modify the function that does the data load, in oder to transfer the data from the file into the node object that d3 uses from rendering the nodes of the graph.
function find(name, data) {
      var node = map[name], i;
      if (!node) {
        node = map[name] = data || {name: name, children: []};
        if (name.length) {
          node.parent = find(name.substring(0, i = name.lastIndexOf(".")));
          node.parent.children.push(node);
          node.key = name.substring(i + 1);
>          if (data){
>            node.time = data.time;
>          }else{
>            node.time = null;
>          }

        }
>      } else {
>        if(!node.time){
>          if (data){
>            node.time = data.time
>          }
>        }
      }
      return node;
    }
With that added, it's just necessary too use the time attribute when rendering the node SVG and the link SVG.
  ...
  var line_post = d3.svg.line()
    ...
    .x(function(d) {return d.time;})
  ...
  svg_post.selectAll(".node")
    ...
    .attr("transform", function(d) {return "translate(" + d.time + "," + d.x + ")";})
  ...
For a little extra flair, I also wanted to make more widely dispersed data show up as a thicker line. To do that, I just added duplicated paths with randomly jittered endpoints. You can check the code if you want to see how I duplicated the paths, but for the random jitter I used a simple rough approximation of a normal distribution in x and y.
function myrandom(){
  /* approximate a normal distribution (sort of) */
  /* using straight uniform makes everything look square */
  var r = 0;
  for(var i = 3; i > 0; i --){
      r += Math.random();
  }
  return 1.25*(r/3 - 0.5)
}

var line_pre = d3.svg.line()
  ...
  .x(function(d) {return d.time+myrandom()*d.size;})
  .y(function(d) {return d.x+myrandom()*d.size; });
Styling
There's some additional styling that yu can check out in the code directly. To make the opposite side of the identifield, I duplicated all the above, but inverted the x-axis by sutracting the x positions from width (eg .x(function(d) {return width - d.time+myrandom()*d.size;})).
The complicated graph
Since I didn't want to hand generate a really big graph, I used some python code to generate the structure for me. The function is really quite simple; it just randomly branches a tree with probability child_prob, and then adds an arm to the tree that is also randomly chosen from time_inc_rand.
def add_node(node_list, parent_name, parent_time, parent_size, parent_weight):
    name = parent_name+'.'+''.join([random.choice(string.ascii_letters) for n in range(5)])
    imports = [center]
    time = parent_time - int(time_inc_min +  time_inc_rand * random.random())
    if time < 50:
        return
    while random.random() < child_prob:
        add_node(node_list, name, time, parent_size, parent_weight)
    while random.random() < child_prob:
        node_list.append({"name":name+'.'+''.join([random.choice(string.ascii_letters) for n in range(5)]),
                          "time":time-5,
                          "size":parent_size,
                          "weight":parent_weight,
                          "imports":[center]})
        imports = []
    node_list.append({"name":name,"time":time,"size":parent_size,"weight":parent_weight,"imports":[]})
However, the variety of output that it could generate by varying those parameters was astonishing to me. This led me on another analytical meandering into the shapes that develop from hierarchies with random children, random edge lengths, and random leaf dispersions. I've started a project with the code to do the generation of the json objects with random parameters. It's really fascinating, and I will add a link here when I finish exploring.
More To Do
There's still much more to do to make the identifield concept clearer. You can fork the code to render identifields from either the simple or the complex bl.ocks, and the code for generating the json objects is on github. If someone out there likes this idea and would like to take it further, please feel free. Let me know what you come up with.
 will stedden